
포스트 API 서버코드 작성하기
// pages/api/post.ts

import { Client } from '@notionhq/client';
import { NotionAPI } from 'notion-client';

import type { IAPIError, Response } from '../../interfaces';
import type { NextApiRequest, NextApiResponse } from 'next';
import type { PageObjectResponse } from '@notionhq/client/build/src/api-endpoints';
import type { ExtendedRecordMap } from 'notion-types';

export default function handler(
  req: NextApiRequest,
  res: NextApiResponse<
    | Response<{
        notionPage: ExtendedRecordMap;
        post: PageObjectResponse;
      }>
    | IAPIError
  >
) {

	// ...
	// ...

  const page_id = req.query.id as string;
  const notion = new Client({
    auth
  });

  (async () => {
    try {
      if (req.method === 'GET') {
        const response = (await notion.pages.retrieve({
          page_id
        })) as PageObjectResponse;
        const notionPage = await notionRenderClient.getPage(page_id);

        const data = {
          notionPage,
          post: response
        };

        res.status(200).json({
          data,
          status: 'ok',
          error: null
        });
      } else {
        res.status(405).json({});
        return;
      }
    } catch (e) {
      const error = e as any;
      const { status, body } = error;
      res.status(status).json(JSON.parse(body));
    }
  })();
}
이 전에 사용했던
posts.ts 파일과 유사하지만 여기서는 req 의 아이디를 추출하여 노션페이지를 각각 추출한다.여기서 우리가 사용할 라이브러리가 있다.
react-notion-x
노션에 작성한 컨텐츠를 직접 렌더하지 않고
react-notion-x 라는 라이브러리를 이용하여 렌더할것이다.yarn add react-notion-x
위 예시에서 아래와 같은 코드가 있다.
const notionPage = await notionRenderClient.getPage(page_id);
이 코드를 이용하여 해당 페이지를 렌더링 할 내용을 가져온다.
const response = (await notion.pages.retrieve({
    page_id
  })) as PageObjectResponse;
그리고 이 부분에서 페이지의 상세 정보를 가져온다. 이 정보는 자세히보기 페이지 커버이미지 타이틀을 표시하기 위함이다. 사실
react-notion-x 에서 fullPage 라는 프로퍼티로 모든걸 해결 할 수 있긴 하지만, 내 블로그 테마와 살짝 어긋나는 부분이 있기 때문에 포스트의 제목이나 커버이미지는 따로 가져 올 계획이다.클라이언트 코드 작성하기
// core/apis/posts.ts

import { PageObjectResponse } from '@notionhq/client/build/src/api-endpoints';
import { request } from './';

import type { ExtendedRecordMap } from 'notion-types';

export const postApis = {
  // ...
	// ...

  getPost: (id: string) =>
    request<{
      notionPage: ExtendedRecordMap;
      post: PageObjectResponse;
    }>({
      url: '/post',
      method: 'GET',
      params: {
        id
      }
    })
};
서버 코드쪽에
post.ts 로 포스트를 가져오는 api도 만들었으니 클라이언트 쪽에도 추가해준다. 이렇게 getPost 함수를 추가하였다.// core/queries/posts.ts import { useQuery, UseQueryOptions } from 'react-query'; import { postApis } from '../apis/posts'; import type { PageObjectResponse } from '@notionhq/client/build/src/api-endpoints'; import type { Response } from '../../interfaces'; import type { ExtendedRecordMap } from 'notion-types'; export const postsQueryKey = { posts: () => ['posts'] as const, post: (id: string) => ['post', id] as const }; // ... // ... export const useGetPost = ( id: string, options?: UseQueryOptions< Response<{ notionPage: ExtendedRecordMap; post: PageObjectResponse; }> > ) => { return useQuery( postsQueryKey.post(id), () => postApis.getPost(id), options as any ); };
이렇게
useGetPost 라는 react-query 의 커스텀 훅을 추가해주었다.동적 라우팅 구현하기
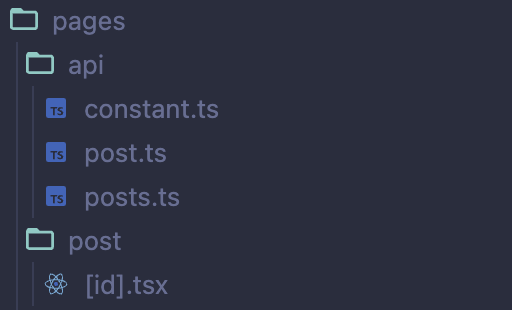
이미지에서
pages/post/[id].tsx 라는 부분을 보면 조금 특이한 방식으로 파일을 생성했다. 이렇게 [id].tsx 파일을 생성해주면 클라이언트에서 접속시 /post/:id 와 같은 패턴으로 사용이 가능하다.// pages/post/[id].tsx import Post from '../../components/Post'; import { postApis } from '../../core/apis/posts'; import type { GetServerSideProps } from 'next'; import type { ExtendedRecordMap } from 'notion-types'; import type { PageObjectResponse } from '@notionhq/client/build/src/api-endpoints'; import type { Response } from '../../interfaces'; import 'react-notion-x/src/styles.css'; import 'prismjs/themes/prism-tomorrow.css'; import 'katex/dist/katex.min.css'; interface IPostPageProps { id: string; data: Response<{ notionPage: ExtendedRecordMap; post: PageObjectResponse; }>; } export default function ({ id, data }: IPostPageProps) { return <Post id={id} data={data} />; } export const getServerSideProps: GetServerSideProps = async (context) => { const id = context.params?.id?.slice(1) as string; if (!id) { return { notFound: true }; } try { const res = await postApis.getPost(id); return { props: { id, data: res } }; } catch (e) { return { notFound: true }; } };
구현된 페이지는 아래와 같다.
getServerSideProps 에서 처럼 id 를 context 라는 파라미터에서 추출하여 사용할 수 있다. 이 id 로 포스트 목록을 만든것과 같은 방식으로 서버단계에서 미리 데이터를 페칭한다. 그리고 <Post /> 컴포넌트에 데이터를 주입해준다.포스트 화면 구현하기
// components/Post/Post.tsx

import dynamic from 'next/dynamic';
import { NotionRenderer } from 'react-notion-x';
import useRootState from '../../core/hooks/useRootState';

import type { ExtendedRecordMap } from 'notion-types';
import { PageObjectResponse } from '@notionhq/client/build/src/api-endpoints';
import { useGetPost } from '../../core/queries/posts';
import type { Response } from '../../interfaces';

interface IPostProps {
  className?: string;
  id: string;
  data: Response<{
    notionPage: ExtendedRecordMap;
    post: PageObjectResponse;
  }>;
}

const Code = dynamic(() =>
  import('react-notion-x/build/third-party/code').then((m) => m.Code)
);

const Post: React.FC<IPostProps> = ({ id, data, className }) => {
  const { mode } = useRootState((state) => state.theme);

  const { data: postData } = useGetPost(id, {
    initialData: data
  });

  return (
    <div className={`post-wrapper ${className}`}>
      {postData?.data.notionPage && (
        <NotionRenderer
          recordMap={postData.data.notionPage}
          darkMode={mode === 'dark'}
          components={{ Code }}
        />
      )}
    </div>
  );
};

export default Post;
NotionRenderer 를 이용하여 가져온 notionPage 데이터를 넣어주면 자동으로 렌더하게 된다.const Code = dynamic(() => import('react-notion-x/build/third-party/code').then((m) => m.Code) ); // ... // ... <NotionRenderer // ... components={{ Code }} />
이 부분을 추가하여야 코드블럭까지 정상적으로 렌더된다.
이렇게 하면 블로그의 전체적인 툴은 완성되었다. 이
NotionRenderer 를 이용해서 포스트 페이지는 날먹으로 완성이 되었다.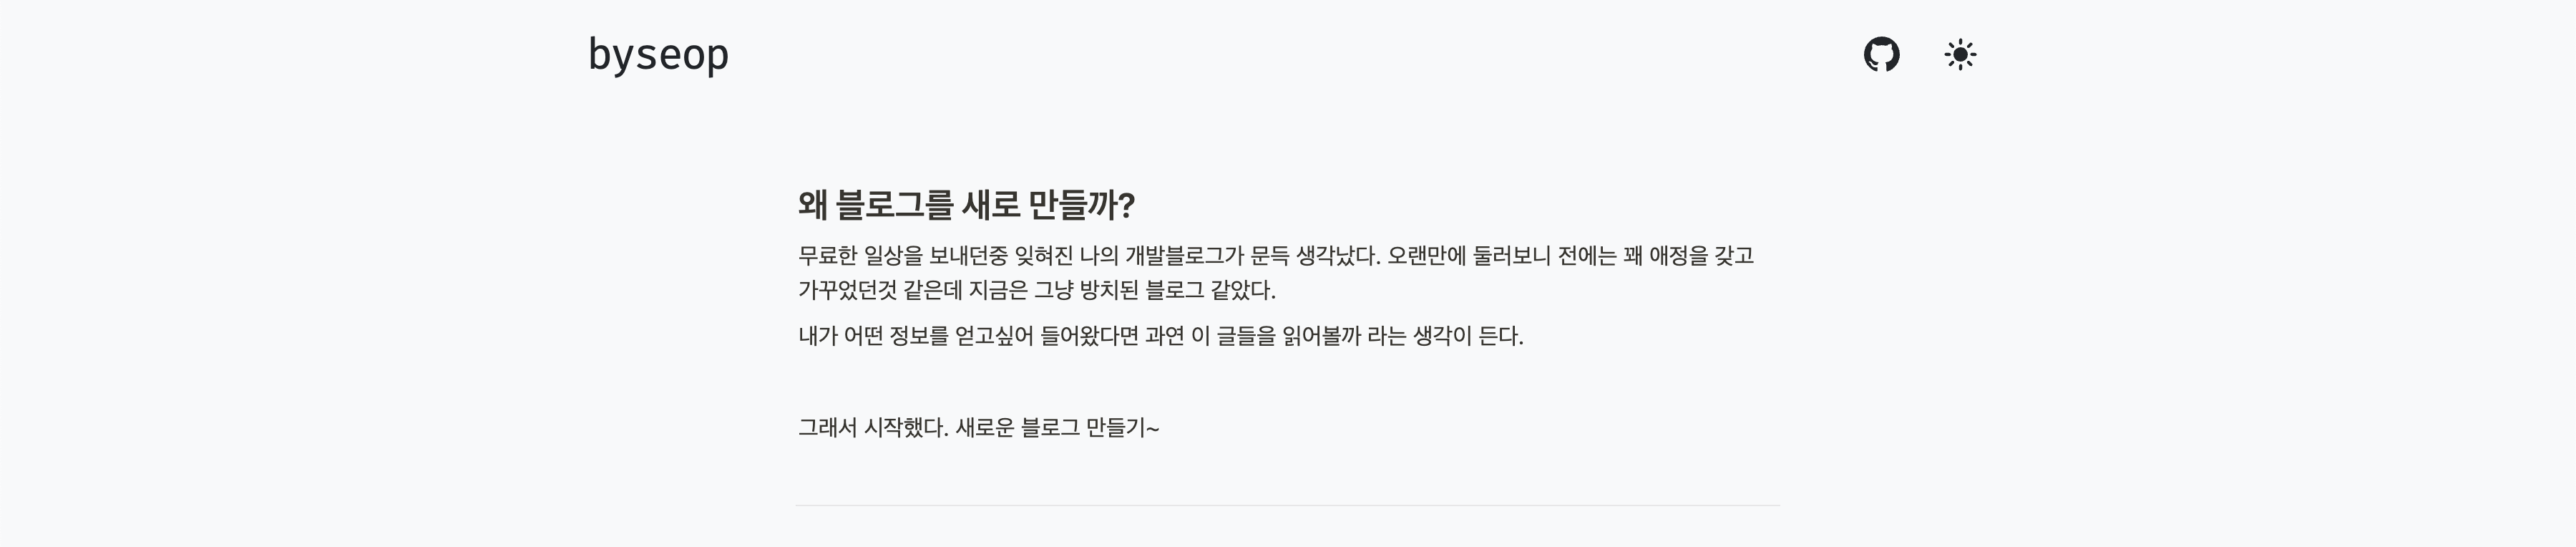

마무리
이제는 기본적인 블로그의 모습을 보이고 있다. 3일동안 짬날때 마다 작업한거 치고는 꽤 만족스러운 결과물이다.